Spinning up a Docker container is so simple that a caveman could do it. Well, if cavemen had computers of course. When you start a container, you are also connecting to a specific Docker network. Docker utilizes a “batteries included, but replaceable” architecture meaning that the default network your containers connect to works well in many cases but can also be replaced with a custom network. In this blog post, we are going to dive into Docker networking and see what is going on in the background and why it is important.
Prerequisites:
- Docker Installed (Required)
- Some basic understanding of networking (Nice to have, but not required)
Suggest Reading on Networking Topics
- How DNS Works: https://howdns.works/
- What is a NAT Firewall?: https://www.comparitech.com/blog/vpn-privacy/nat-firewall/
Let’s start off with a basic Docker command to run an nginx:apline web server container and forward traffic from port 80 of our host machine into port 80 of our container:
docker container run -p 80:80 --name testwebhost -d nginx:alpine
We can now list our port mappings for that container using:
docker container port testwebhost
You should now see that port 80 of your host is forwarding traffic to port 80 of the container.
What about the container’s IP address? You may think that containers use the same IP address as the host machine but that is not the case. We can test this using a Docker inspect command.
You could simply run docker container inspect and search through the output for the IP address. Instead let’s use a format option. You can re use this command with format option to pull any information from a Docker inspect output but in this case we want the IP address from the network settings.
docker container inspect --format "{{ .NetworkSettings.IPAddress }}" testwebhost
You should be able to see that the IP address of your container is not the same as your host machine. So what is going on here?

The firewall on your host machine, by default, blocks all incoming traffic. So, although our containers can get out onto the web, no incoming traffic can reach our containers. Well, this would be true if we simply ran the container without using the publish option.

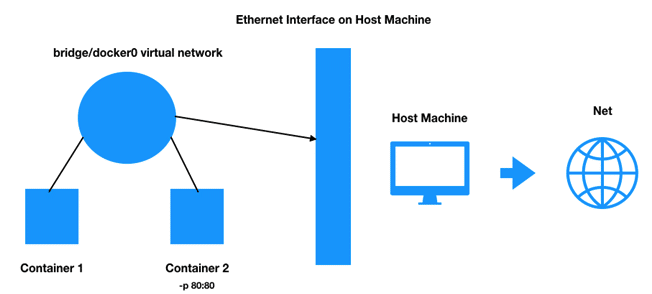
Since we published port 80 of our container to port 80 of our host machine, incoming traffic to our host on port 80 will be routed through the bridge network to port 80 of our container. “Routed” is the important word here. It’s not just that port publishing opens the firewall, but also that it creates a port forward via NAT into the Docker network. Note that you cannot publish to the same host port twice. This is not a limitation of Docker but of IP networking in general.
This covers incoming traffic being able to reach our container, but what about containers communicating with each other? In the diagram above you can see one container on the bridge network was started with the publish option (Container 2) and another which was not (Container 1). The beauty of Docker networking is that containers running on the same network are free to communicate with each other over their exposed ports.
When you think about virtual networks in Docker and where containers belong, think about how different containers are related to one another in their application. Best practice is to place containers that need to communicate to one another on the same virtual network otherwise they have to go out though the host on a published port then route back to a different virtual network.
Now that we understand the concepts of Docker networking let’s look at some of the command line options for managing our networks.
Lets start with listing all of our created networks using:
docker network ls
Depending on what version of Docker you are using you should either see a network called bridge or Docker0. As stated before, this is the default network your containers are attached to unless specified otherwise. It is bridges through the NAT firewall on your host machine to the physical network that your host is connected to. Remember that at the beginning of this we ran an nginx container called testwebhost and did not specify a network so it should be connected to our bridge network. We can confirm this by running:
docker network inspect bridge
You will see that it lists the containers attached to that network and you should see our testwebhost container we created at the beginning. You will also see its IP address.
"IPAM": {
            "Driver": "default",
            "Options": null,
            "Config": [
                {
                    "Subnet": "172.17.0.0/16",
                    "Gateway": "172.17.0.1"
                }
            ]
        },
        "Internal": false,
        "Attachable": false,
        "Ingress": false,
        "ConfigFrom": {
            "Network": ""
        },
        "ConfigOnly": false,
        "Containers": {
            "36e5ccab51a095c84f17ac3b5401ecdd4bc0dcc38f3c0696c8dd613f44547803": {
                "Name": "testwebhost",
                "EndpointID": "6cf6db7e5e5f482fb4f5da2f498c9058328ab307072140c091194f672bb02149",
                "MacAddress": "02:42:ac:11:00:02",
                "IPv4Address": "172.17.0.2/16",
                "IPv6Address": ""
            }
        }
Networks automatically assign IP addresses. You can see in the IPAM config that the subnet is 172.17.0.0/16, which is the default range for Docker’s bridge network, unless your host is already within that subnet. You will also see the gateway for this network out to the physical network.
If you recall from before when we ran the docker network ls command there were two other networks along with the bridge network, host and none. The host network is a special network that skips the virtual networking of Docker and attaches the container directly to the host interface. There are pros and cons of using this network, but is sometimes required to be used for certain use cases such as applications that require higher throughput. The none network is equivalent of having an interface on your computer that is not attached to anything. Now that we have an understanding of these networks let’s make our own by running:
docker network create test_net
Let’s now again list out our available networks with:
docker network ls
You will see that Docker has created our new virtual network using the default ‘bridge’ driver. It is a simple driver that creates a virtual network whose subnet increments with each additional network. This is missing a lot of features you could get with third party drivers but is great for local testing. You can control the subnet allocated to the network at creation with the --subnet flag.
When spinning up a container you can specify which network for it to attach to and may be able to connect and disconnect existing containers to networks. Let’s connect our existing testwebhost container to our newly created network using:
docker network connect test_net testwebhost
This command is dynamically creating a NIC in our testwebhost container and connecting it to our new test_net network. Now let’s inspect that container again with:
docker container inspect testwebhost
"Networks": {
                "bridge": {
                    "IPAMConfig": null,
                    "Links": null,
                    "Aliases": null,
                    "NetworkID": "7e566ff7fe5880dc453fbb49875ef126fca2a3a21a94b4c26879ae458a2e9ba4",
                    "EndpointID": "6cf6db7e5e5f482fb4f5da2f498c9058328ab307072140c091194f672bb02149",
                    "Gateway": "172.17.0.1",
                    "IPAddress": "172.17.0.2",
                    "IPPrefixLen": 16,
                    "IPv6Gateway": "",
                    "GlobalIPv6Address": "",
                    "GlobalIPv6PrefixLen": 0,
                    "MacAddress": "02:42:ac:11:00:02",
                    "DriverOpts": null
                },
                "test_net": {
                    "IPAMConfig": {},
                    "Links": null,
                    "Aliases": [
                        "36e5ccab51a0"
                    ],
                    "NetworkID": "bc9b702a030ee894bad2461c02933bd81fadc98380685e207daea46e32292de2",
                    "EndpointID": "1bea3c68678f6adb7ccc0e6a0fbff621b9c347c70ffb48eef587f0f19ac7bffd",
                    "Gateway": "172.22.0.1",
                    "IPAddress": "172.22.0.2",
                    "IPPrefixLen": 16,
                    "IPv6Gateway": "",
                    "GlobalIPv6Address": "",
                    "GlobalIPv6PrefixLen": 0,
                    "MacAddress": "02:42:ac:16:00:02",
                    "DriverOpts": null
                }
You should see that our container is not connected to both the bridge network as well as our newly created test_net network. The reverse of this can be accomplished with a Docker network disconnect command. The last thing we are going to discuss is DNS and how it relates and is important to Docker networking.
DNS is crucial to Docker networking because in the world of containers – where there can be an endless number of containers being created or deleted at any given moment – you cannot rely on IPs for talking to containers as they are very dynamic by nature. It turns out that Docker uses the container names as the equivalent of a host name for containers talking to each other. Remember that currently we have our single container testwebhost connected to our network test_net. Now because we created this new network rather than using the default bridge network, we get a new feature. This feature is automatic DNS resolution for all containers on that network using their container name. If we were to create another container and connect it to our test_net network, those two containers would be able to find each-other regardless of what their IP addresses are using their container name. Let’s test this by spinning up a new nginx container onto that network and then pinging the existing container on the same network:
First, spin up the new container onto our network:
docker container run -d — name testwebhost2 —network test_net nginx:alpine
Let’s make sure it’s connected to our network with:
docker network inspect test_net
Finally, let’s ping our original container using our new one by executing a new command on our new container:
docker container exec -it testwebhost ping testwebhost2
You should see that DNS resolution just works how you would expect. Unlike IP addresses, container names will always stay the same so you can rely on them. It is fair to note here that although we are using the bridge driver for our created network, the bridge network by default does not have automatic DNS resolution enabled. It is so simple to create your own network that I highly recommend always avoiding using the bridge network.
In conclusion, the goal of this blog was just to give users a taste of how Docker networking works under the hood as well as discuss some best practices. There is much more to cover regarding Docker networking such as what role it plays in Docker compose and Docker swarm.


